Friday, June 30, 2023

Paper Pumpkin Blog Hop - June 2023

Welcome to the September kit Paper Pumpkin Blog Hop. A Group of Stampin' Up! Demonstrators join to create collaboratively using the current Paper Pumpkin Kit. Specifically, we design alternative cards, scrapbook pages, or other paper projects using the contents of the kit and a few coordinating additions from our own stash.


The June 2023 Welcome Inn Kit coordinated with the Countryside Inn suite and had an optional purchase of Add on Die Cuts to create more fun with this kit. 

The Kit Contains: 
  • 9 coordinating envelopes
  • 1 Night of Navy Stampin’ Spot
  • 1 photopolymer stamp set
  • Coordinating Night of Navy embellishments
  • Detailed vase and banner die cuts
  • Addon option of 3 dies: Largest die: 1-1/2” x 1-1/2” (3.8 x 3.8 cm)
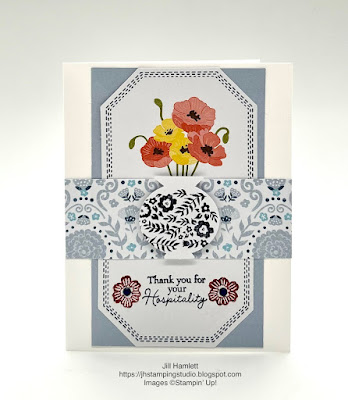
  • I cut up one of the card bases, trimmed it as a layer and adhered it to basic white card base. 
  • I took the die cut with the floral element on it and cut it in half, adhering it to the top and lower portion of the blue card layer
  • I cut/trimmed the envelope flap which is adhered in the middle of the card. It has such a pretty design!
  • Using the Night of Navy ink spot I stamped the floral image on an extra white vase from the kit. I adhered it with stampin dimensionals. 
  •  I also stamped the sentiment on the lower half of the die cut piece and added stamped floral images with Calypso Coral to it 
Don’t forget to check out all the fun projects made as part of this blog hop. Click the next button below to hop along! 

Check out the details for July Fun In The Sun kit. Click her for flyer

This kit includes:
  • All the supplies you need to create 9 cards: 3 each of 3 designs;
  • 9 coordinating envelopes.
  • An all-occasion stamp set to support and encourage those you love.
  • Pearlescent Backed Sequins.
  • Summertime Ephemera Pack.
  • Precut die cuts.
  • One Daffodil Delight Stampin’ Spot.
Check out the below options to prepay a subscription or click to subscribe between now and July 10, 2023 for your own monthly Paper Pumpkin

Orders under $150 use the July Host Code GYGGJNCW or give me a call to place your order in this workshop. Orders at $65 or more qualify for the free Loyalty/VIP gift of Black Stampin' Dimensionals Combo Pack.

Jill Hamlett
Stampin’ Up!® Independent Demonstrator
763-442-8284
Hamlett05@gmail.com

Shop Stampin Up
For Creative Inspiration - follow my blog
Join Stampin' Up! - $99 Starter Kit, choose $125 in product + other free items
Paper Pumpkin - Subscribe/order by 10th of each month
Pinterest - I would love to have you follow me!
JH Stamping Studio Private FB Group


Product List

Sunday, June 25, 2023

Share It Sunday - June 2023 - Paper Piercing

The Crafty Collaborations Team is comprised of Stampin' Up! Demonstrators from around the world. Each month we participate in several collaborative projects, including Blog Hops, like this one to inspire all of us in our passion for crafting. Our Goal is to create, share, and inspire every crafter to keep our creative energy flowing.
Today Features the Monthly Share It Sunday blog hop where the team shares any project they have been working on. I have been participating in a monthly challenge to create projects using various techniques with Stampin' Up! designer series paper. Paper Piercing is one of those fun techniques. With only 5+ days left to take advantage of the Designer Series Paper Sale; you'll want to get your order in by June 30th to get the 15% off sale price.  

For this project, I turned to the Coffee With Friends stamp set and Delightfully Eclectic Designer Series Paper with the new Bubble Bath color. I stamped the main image on a 4" x 2 1/4" basic white card stock. I then stamped the shirt on the floral print design and the pants on the striped print design. It takes a bit of careful cutting around the stamped image, but it is doable.


 I then adhered the pieces to the women in the image and then colored the sandals, cup, hair and stairs. 


Once the additional layers of paper were added, it really seemed to pop the image. I stamped the sentiment right on the basic white and added an additional fun sentiment and image on the inside. I'm really happy with how this turned out.

Card Details
  • Stamps
    • Coffee With Friends 
  • Paper
    • Bubble Bath -card base 4 1/4 x 11 score 5 1/5
    • Crumb Cake - layer 3 1/2 x 4 5/8 
    • Delightfully Eclectic Designer Series Paper- 2 7/8 x 4 3/8
    • Basic White - 2 1/4 x 4
  • Ink
    • Crumb Cake
    • Stampin Blends: Ivory & Bronze; Dark Flirty Flamingo; Light Cherry Cobbler
  • Other 
    • Adhesives: Seal, Multipurpose glue, Dimensionals
Now Let's dig into more collaborative fun. Grab a beverage, sit back, and enjoy the hop! I hope you find awesome ideas and inspiration for your projects.

If you like any of the products used to make this card, see below for links to my store of the products used to make this project and place your order today! Orders under $150 use the July Host Code GYGGJNCW or give me a call to place your order in this workshop. Orders at $65 or more qualify for the free Loyalty/VIP gift of Black Stampin' Dimensionals Combo Pack.

Jill Hamlett
Stampin’ Up!® Independent Demonstrator
763-442-8284
Hamlett05@gmail.com

Shop Stampin Up
For Creative Inspiration - follow my blog
Join Stampin' Up! - June 2023 Special- $99 Starter Kit, choose $155 in product + other free items
Paper Pumpkin - Subscribe/order by 10th of each month
Pinterest - I would love to have you follow me!
JH Stamping Studio Private FB Group

Product List
Paper Snips
[103579]
$11.00

Saturday, June 24, 2023

#DOswts413 - Embossing Folders Inspiration Hop

Welcome to the DO Stamper Stars Blog Hop. I am a member of the DO Stamper Stars team which is comprised of Stampin' Up! Demonstrators who are part of Dawn Olchefkse's leader team. Each month we participate in 2 Blog Hops, like this one, to inspire all of us in our passion for crafting. Our Goal is to create, share, and inspire every crafter to keep our creative energy flowing.


I've been meaning to try the embossing with wax paper technique for some time now and decided to give a few folders a try. When you use this technique, you get (2) samples so I used Basic White and Very Vanilla to see how each would turn out. 
  1. Plug your iron in on hottest setting so it heats up
  2. Cut your wax paper to size (3 x 5 in my cards)
  3. Run though embossing folder. 
  4. Place wax paper between 2 layers of same size or just slightly larger card stock paper. 
    1. Place this sandwich on top of piece of printer paper/surface that can withstand the iron.
  5. Place hot iron over it allowing the 'wax' embossing to transfer to the cardstock layers 
  6. Add color with blending brushes to show the embossed images. I decided to go with a rainbow type look. which meant I used some masking paper between the different colors. 
    1. This reminds of the emboss resist technique. 


You can see the two different styles of cards. I picked more muted colors for the vanilla base card and decided to stamp right onto the layers of embossed colors, adding a ribbon and embellishments to dress up the card. I ironed a few other embossed images, so you'll see some more samples of this technique in the near future! 

Card Details
  • Stamps
    • Card 1 -Quiet Medow
    • Card 2: Happy Hedgehogs & Easter Bunner 
  • Paper
    • Basic White or Very Vanilla Thick Card Base: 8 1/2 x 5 1/2 score 4 1/4 
    • Basic White or Very Vanilla Layer: 3 x 5 
    • Basic Black or Pecan Pie layer: 3 3/8 x 5 + scrap for Hedgehog builder 
    • Crumbcake scrap for Hedgehog punch
    • Wax Paper (3 x 5)
  • Ink
    • Tuxedo Black Memento -sentiment/floral image
    • Early Espresso - sentiment/hedgehog
    • Gorgeous Grape; Granny Apple Green, Coastal Cabana, Poppy Parade, Daffodil Delight 
    • Highland Heather, Old Olive, Pool Party, Pumpkin Pie, Crushed Curry 
  • Other
    • Blending Brushes 
    • Masking Paper
    • Stampin Cut & Emboss Machine (mini)
    • Stripes & Splatters 3D embossing folder 
    • Hedgehog Builder punch 
    • Black & White 1/4 "Gingham ribbon 
    • Adhesive Backed Sparkle Gems
    • Pecan Pie 1/2" Bordered Ribbon 
    • Opaque Ovales
    • Adhesives: Seal, Multipurpose glue, Mini Glue Dots, Dimensionals
Now Let's dig into more collaborative fun. Grab a beverage, sit back, and enjoy the hop! I hope you find awesome ideas and inspiration to make cards of your own

If you like any of the products used to make this card, see below for links to my store of the products used to make this project and place your order today! Orders under $150 use the June Host Code GYGGJNCW or give me a call to place your order in this workshop. Orders at $65 or more qualify for the free Loyalty/VIP gift of Black Stampin' Dimensionals Combo pack.


Jill Hamlett
Stampin’ Up!® Independent Demonstrator
763-442-8284
Hamlett05@gmail.com

Shop Stampin Up
For Creative Inspiration - follow my blog
Join Stampin' Up! – June 2023 Special- $99 Starter Kit, choose $155 in product + other free items
Paper Pumpkin - Subscribe/order by 10th of each month
Pinterest - I would love to have you follow me!
JH Stamping Studio Private FB Group
Product List

Share It Sunday - December 2023 - Birthday Card Organizer Kit

The Crafty Collaborations Team is comprised of Stampin' Up! Demonstrators from around the world. Each month we participate in several co...