Pages

Monday, October 25, 2021

Paper Pumpkin Blog Hop - Alternative Inspiration October 2021

Welcome to the October Paper Pumpkin Blog Hop. A Group of Stampin' Up! Demonstrators join to create collaboratively using the current Paper Pumpkin Kit. Specifically, we design alternative cards, scrapbook pages, or other paper projects using the contents of the kit and a few coordinating additions from our own stash.


The October kit Peaceful Christmas


Details
· The kit contains enough elements to create 10 Christmas cards—5 each of 2 designs—and coordinating envelopes. This all-inclusive kit includes printed card bases, die-cut paper pieces, embellishments, adhesive, and more!
· October’s kit arrives in a cute collectible box covered with enchanting evergreen trees. Use this special, limited-edition box to store your holiday handicrafts, or transform it into a well-wrapped package for a present!
· The kit’s contents pair perfectly with the Peaceful Place Suite Collection (item 156277). To continue your Christmas crafting, combine the kit’s components with the suite’s patterned paper, shimmery sequins, and more!
· Card size: 4-1/4" x 5-1/2" (10.8 x 14 cm)
· Envelope size: 4-1/2" x 5-3/4" (11.4 x 14.6 cm)
· Coordinating colors: Basic Gray, Real Red, Shaded Spruce, silver foil


I chose to keep my alternative cards simple with this kit. The card bases with the trees are quite stunning and they have images on both the front and back. With this in mind, I cut the card base in half and made 2 cards. I used the elements from the kit to finish the cards off. 

I really can't decide if I like the Basic Black base with Shaded Spruce green layer or the Basic Grey base with Real Red layer. I am partial to red so I probably vote for that one, but they both look so elegant. 

I'm looking forward to making what will likely be double the number of cards from this kit. The sentiments from the stamp set are also really nice and I can use them in my other holiday cards. 

Don’t forget to check out all the fun projects made as part of this blog hop! The Crafty Collaborations group puts on several blog hops a month, as well as monthly tutorial bundles, and other ‘work smarter not harder’ projects. 


Want to make sure you get the next month’s kit? Subscribe now or get one of the pre-paid subscriptions below and activate it before November10th to make sure you get the Gifts Galore kit which has enough supplies to create nine treat packages—three each of three designs—and nine food-safe bags. This all-inclusive kit includes printed die cuts, die-cut boxes, cellophane treat bags, adhesive, and more to get a head start on your Holiday packaging! Or make cards from your cardstock using the supplies. 

To order a prepaid specific monthly subscription see below for your options. Orders less than $150, use Host Code 3CZHVPYF

Jill Hamlett
Stampin’ Up!® Independent Demonstrator
763-442-8284
Hamlett05@gmail.com
Product List

#DOswts373 - Retiform Technique Inspiration Hop

Welcome to the DO Stamper Stars Blog Hop. The DO Stamper Stars is comprised of Stampin' Up! Demonstrators who are part of Dawn Olchefske's leader team. Each month we participate in 2 Blog Hops, like this one, to inspire all of us in our passion for crafting. Our Goal is to create, share, and inspire every crafter to keep our creative energy flowing. 

Today's feature project is a technique I have never done before- Retiform Technique. Check out the video for reference. It is essentially a masking type technique using blending brushes but creates a lot of depth with borders around the images.  

With Halloween coming next week, I chose to use Clever Cats stamp set. The card turned out better than I thought it would. I did struggle a bit with the location of the post notes to mask. The images of the cats are just so darn cute, you can't go wrong!!  


Card Details 
  • Stamps: Clever Cats 
  • Paper:
    • Granny Apple Green (5-1/2" x 8-1/2" card base)
    • Basic Black  (4" x 5-1/4" layer)
    • Basic White (3 3/4" x ")
  • Ink: Granny Apple Green, Tuxedo Black
  • Other: Blending Brushes, Stampin' Seal, Stampin' Dimensionals & Sticky Notes for masking
Now Let's dig into more collaborative fun. Grab a beverage, sit back, and enjoy the hop! I hope you find awesome ideas and inspiration to create using this new technique!


To order any of these products shop my store 24/7. Orders under $150 use the October Host Code

Jill Hamlett
Stampin’ Up!® Independent Demonstrator
763-442-8284 
Hamlett05@gmail.com 

Product List

Wednesday, October 20, 2021

Scrapbooking Global Hop - October 2021 - Tag It!

The Scrapbooking Global Team is comprised of Stampin' Up! Demonstrators from around the world. Each month we participate in a scrapbooking Blog Hop Theme, like this one, to inspire all of us in our passion for crafting. Our Goal is to create, share, and inspire every crafter to keep our creative energy flowing.


Today's Theme is "Tag It!"  brought to you by Design Team Member, Shari Haynes.


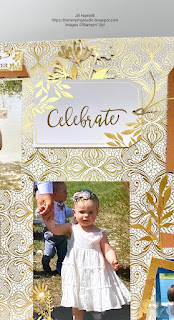
I have had a busy week + spending time with my daughter and her family. My granddaughter is just 18 months old and we don't get to see her often, so I spent as much time a I could with them. With her in mind, I had some photos from a wedding she participated in this summer as the flower girl with her 'Twin' cousin - they were born on the same day! I thought this would be an adorable layout for this theme.

I turned to our Simply Elegant Designer Series paper and  some tags/elements from the Blackberry Beauty Ephemera pack that complimented the gold elements so well. It is a beautiful pack! 


I added Cinnamon Cider card stock to set off the tags so they did not get washed out by the background paper. 


I used the sentiment from the Elegantly Said stamp set for the wedding couple. I also really love the sentiments from Lovely you. Setting the frame a bit lopsided shows the playful side of the children. 
 

Last but not least, I used the 'Celebrate' and 'Love' from Create With Friends on the two larger tags from the Ephemera pack. I just love to add memory pages of my granddaughter. It's one of the main ways I stay connected with her being so far away. 


I hope this inspires you to pull our your stash and create some pages. It's easy to do with all the wonderful products Stampin' Up! has that coordinate together. 

Now Let's dig into more collaborative fun. Grab a beverage, sit back, and enjoy the hop! I hope you find awesome ideas and inspiration for your projects.


/>


If you like any of the products used to make this layout, you can shop my store 24/7. Orders less than $150, use Host Code 3CZHVPYF 

Jill Hamlett
Stampin’ Up!® Independent Demonstrator
763-442-8284 
Hamlett05@gmail.com 

Product List

Crafty Collaborations Halloween Themed Blog Hop

The Crafty Collaborations Team is comprised of Stampin' Up! Demonstrators from around the world. Each month we participate in several collaborative projects, including Blog Hops, like this one to inspire all of us in our passion for crafting. Our Goal is to create, share, and inspire every crafter to keep our creative energy flowing. 

Today features a Halloween theme. Members of the blog hop will share all sorts of crafty ideas for Halloween! 

I've been crafting like crazy getting ready to a Craft Fair. I originally thought I'd do up some 3 x 3 cards that you place in gift packages or like a gift tag for a gift bag. However, the more I thought about it, I don't see a good demand for this type of card with Halloween gifts. I decided to take the 3 x 3 cards I already started and turn them in to a card, using the 3 x 3 envelope as a gift card holder inside the card. 


The Cute Halloween designer series paper is simply the best for creating anything Halloween. I just love the images and coordinating designs of this paper. Additionally, the Clever Cat stamp set is a perfect compliment and makes me smile whenever I see the results. 


Here is how I used the 3x3 envelope inside the card, stamped the sentiment from A Wish For Everything and added some paper to set off the white envelope. I show it with a gift card inside. Tip: just fold back the envelope flap with a bit of seal first and then use seal or glue to attach it to inside of card

Card Details
  • Stamps: 
    • Clever Cat 
    • A Wish For Everything
  • Paper: 
    • Basic Black Card Base 4 1/4 " x 11 -scored at 5 1/2"
    • Basic White:3 3/4 x 4 1/4, + scrap for circle die cut 
    • Pumpkin Pie: 2 1/2 x 4, & 2 1/2 x 4 1/4, + scrap for pumpkin image (fussy cut)
    • Cute Halloween Designer Series Paper: (3) 3 x 3 coordinating squares 
  • Ink
    • Pumpkin Pie 
    • Tuxedo Black Memento 
  • Other 
    • 3 x 3 envelopes  
    • Circle Layering Dies
    • Seal
    • Dimensionals 


I've got a few more I will be making and include a simple of another card in the above photo with the Clever Cat image and that cute witch hat I fussy cut. 

Now Let's dig into more collaborative fun, Grab a beverage, sit back, and enjoy the hop! I hope you find awesome ideas and inspiration for your Halloween projects. 

If you like any of the products used to make this card, you can shop my store 24/7. Orders less than $150, use Host Code 3CZHVPYF  

Jill Hamlett
Stampin’ Up!® Independent Demonstrator
763-442-8284
Hamlett05@gmail.com
Shop 
Blog 
Demonstrator website 
Paper Pumpkin 


Product List